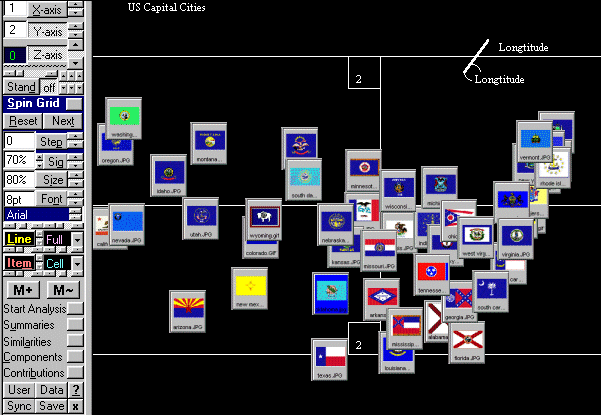

This image was created by utilizing the Window Menu option to realign the forms so that my image capture program "Paint Shop Pro" was able to capture multiple images which were then made into an animation.
The image map created inside this html file was created by pressing Ctrl+C while the grid inGridX version 0_7_0.txt was in this position. Wordpad was then used to paste the image map html data into this file and it was resaved and linked to the animation referred to by the image map.
Even though the grid input text file now contains some code that looks like HTML, it isn't an html file. It is still a regular ingrid input file however the 1st and 4th blank lines that were previously used to separate the data sections are now used to hold references to the files which contain the image map data.
See the Grid Entry Table for details.
For those grids where you want to use an image as well as labels and phrases to describe your elements and constructs, the 1st and 4th line of the input text file correspond to the upper left and lower right cells of the Grid Entry Table.
These files still have to reside on your local computer and there isn't yet a facility to dynamically bring this data in from the internet, though there is a note to transform the entire input text file into XML format.
The " href=" and " img src=" tags are taken from the HTML format and are used primarily for identification and although any other form of ID could have been used, I chose to use them in order to start migrating the input text file to become wholly XML compatible.
At a minimum you can omit the " href=" line altogether but you would also not be able to resync the image maps. You would however be able to manually enter the " coords=" along with the "img src=" line and/or other alternate image map data for each line of elements and/or constructs (Note: - see below for the GraphicCell Property).
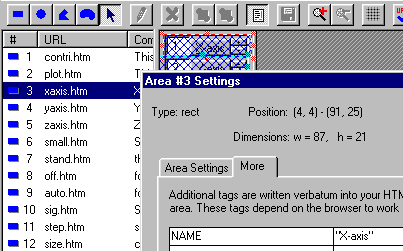
In order to be able to link a standard HTML image map to a inGridX file the element or construct label has to be inserted as an extra HTML tag reference into the original image mapped file. This is done using the Named Anchor, "NAME=" reference. So in the above example where the first element is called "X-axis" the complete line now looks like this: -
X-axis horizontal
axis
<AREA SHAPE=RECT COORDS="4,4,91,25" HREF="xaxis.htm" ALT="X-axis
controls"
NAME="X-axis">
NOTE: - As before, there is no line break allowed on the input text file for each definition of elements or constructs.
The program that you use to imbed the NAME= reference into each
area of the original image map should have an easy facility for doing
this;
- even to the point of adding the equals sign and quote marks.
When inserting these tags, the program I use, Live Image 1.29, looks like the following, however the earlier freeware predecessor to Live Image 1.29 was called MapThis 1.31 and it handles extra HTML in much the same way.
<area SHAPE=RECT COORDS="79,192,166,213" HREF="xaxis.htm" ALT="X-axis controls" NAME="X-axis">
You will note that the remainder of the line is copied to the final image map. This is done so that you don't have to set up another set of links should you decide to make additional image maps of the same grid.
Later there will be a whole raft of options to use different image clips for each of the different types of label that can be used.
As of inGridX 0.7.7 this preparation still has to be manually coded into the input text file and until the program requests are made, it is assumed that you have added the file type suffix to create this GraphicCell file name for the elements and/or constructs, as you will not be prompted for their files.
For now this is only available for elements and maybe later on I'll add this feature to the Construct line (6th line) of the input text file. To do this, manually enter into the Element line (5th line) a 2 decimal suffix to the number of elements and/or constructs to represent the number of columns of graphic cells (max 99). These decimals are stripped off into their own integer system variables and the number of graphic rows for each is calculated.
Also, add a suffix to the element and/or construct name to denote an image file residing in the same directory that contains the picture to be divided. Thus a GraphicCell picture of 6 rows and 8 columns would be, e.g., 48.08 capitals2.gif
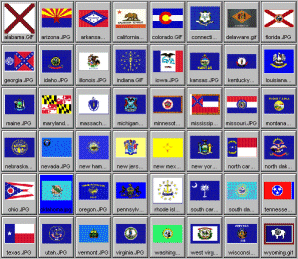
The height of each graphic cell is automatically determined by dividing the height of the source bitmap by the number of specified rows. Leftover pixels at the bottom of the source bitmap (caused by integer rounding) are clipped.
The width of each graphic cell is automatically determined by dividing the width of the source bitmap by the number of specified columns. Leftover pixels at the right of the source bitmap (caused by integer rounding) are clipped.
Internally within the inGridX program there is then a one-dimensional array of pictures representing all of the picture cells. It uses the Rows and Cols properties to divide a picture into a uniform matrix of graphic cells. The cells specified by GraphicCell are indexed, beginning with 0, and increase from left to right and top to bottom.
Later when the software has been developed to use the XML format look out for something like the "DYNSRC=" tag which specifies the address of a video clip or VRML world to be displayed in the window. Stands for Dynamic Source.