
ToolTipText: -
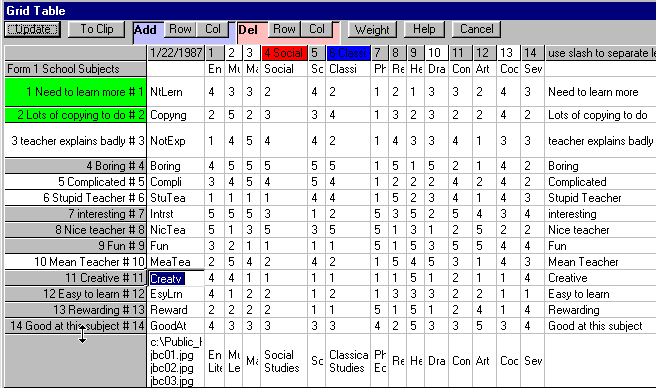
Grid Table Command - Enter Grid Table
There are a number of ways to display the Grid
Table. Clicking the above icon for the Grid Table or using the menu Edit
> Enter Scores F2 will display an expanded grid where each column displays
to the full width of the numbered element and its label. Furthermore all
the fixed row and column cells revert to the color of the vbMenuBar thus
canceling any of the following selection methods.
In the case below there are a number of variations
to the standard Grid Table display. 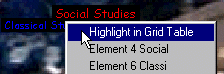 These
are activated by using the Popup Menus triggered when the opposite (right)
mouse button is clicked over a plot item. In this example Social Studies
and Classical studies are highlighted in their 3D colors because the "Highlight
in Grid Table" Popup Menu item was chosen. Furthermore, if you do not close
the Grid Table but swap it to the background by clicking somewhere on the
plot, other items can be highlighted using the mouse. The items who's fixed
row or cell is white are those items that were previously inspected using
the mouse over the plot.
These
are activated by using the Popup Menus triggered when the opposite (right)
mouse button is clicked over a plot item. In this example Social Studies
and Classical studies are highlighted in their 3D colors because the "Highlight
in Grid Table" Popup Menu item was chosen. Furthermore, if you do not close
the Grid Table but swap it to the background by clicking somewhere on the
plot, other items can be highlighted using the mouse. The items who's fixed
row or cell is white are those items that were previously inspected using
the mouse over the plot.
It is in this way that you can perform the "Match
Breaking" inspection ritual of being able to edit the Grid Table in order
to easily discover new rows or columns which will "pull apart" similar
items.
After making changes and if the grid was previously
analyzed, clicking "Update" will replot the changes.
Clicking "Cancel" after making changes will reload
the grid from disk.
If you had previously held the mouse over a plotted item and had entered
this Grid Table routine using the F2 key then that item is highlighted,
e.g. 
Note: - You can position "grab" handles to resize any row or
column. However, these resizings aren't remembered for next time if the
Grid Table is closed.
This table form of input allows you to enter both the names of the elements
and constructs as well as the value for each cell.
In the Dos program, both ELEMENT NAMES and CONSTRUCT NAMES were LABELS
which were six characters in length. inGridX maintains the use of short
labels though they aren't restricted to 6 characters and just can't contain
spaces.
The abbreviated labels (without spaces) for the
elements are entered into the first non fixed row directly above the data
cells and abbreviations for the constructs are entered into the first non
fixed column directly alongside the data cells.
inGridX now makes use of a full explanation of
what each term means and allows you to describe an opposite for each case.
Split labels for opposite ends of bi-polar constructs might seem obvious
but why you would want to use split descriptions for elements is less so.
One example that comes to mind is when I designed a stage set using real
characters from a news story. I used the split description to record the
names of the hand picked actors who I thought would suit the parts.
The full descriptions for the elements are entered
into the very last row and the full descriptions for the constructs are
entered into the very last column. Warning!!!
- only use one slash </> to separate the opposites.
E.g., "Good at this subject / Not Good at this subject". These bipolar
descriptions are displayed at opposite ends of the construct line when
the "Split" option is chosen.
Logically, the split descriptions for elements
can't be shown opposite each other as is the case with constructs so, if
you must, choose to display either the "Left" or "Right" side of the pair.
 If
the HTML code for input image maps is specified in the upper left-hand
and lower right-hand corner cells, i.e., the 1st and 4th blank line of
the input text file, then the PictureClips for the selected cell are shown
in a reserved area beneath the scrollbars in the Grid Entry Table. These
PictureClips are synchronized by using the Sync
If
the HTML code for input image maps is specified in the upper left-hand
and lower right-hand corner cells, i.e., the 1st and 4th blank line of
the input text file, then the PictureClips for the selected cell are shown
in a reserved area beneath the scrollbars in the Grid Entry Table. These
PictureClips are synchronized by using the Sync command.
 Note: -
That there is the additional short form of GraphicCell
method for designating images to elements and constructs. Unlike the image
mapped PictureClips the selected GraphicCell is shown in the fixed row
or column and only when that fixed cell is clicked does the image appear.
Note: -
That there is the additional short form of GraphicCell
method for designating images to elements and constructs. Unlike the image
mapped PictureClips the selected GraphicCell is shown in the fixed row
or column and only when that fixed cell is clicked does the image appear.
The first fixed column of this data entry table
is determined by the construct labeling option. So, if your full descriptions
are too long choose a shorter, e.g., "Label"  option.
inGridX uses the standard MsFlexGrid control for
entering data. It is fully compliant with tab delimited formats for copying
to and from other programs such as Excel or Word. To Copy data from this
table you first have to select it with either a mouse click in the top
left corner to select the entire grid or any other row or column or group
of cells. After selection Click the  command and the data is copied to the system clipboard. Do not use the
Edit > Copy
or Ctrl+C commands as they are only for copying the main window to the
clipboard.
command and the data is copied to the system clipboard. Do not use the
Edit > Copy
or Ctrl+C commands as they are only for copying the main window to the
clipboard.
If you have selected an area in this manner,
you can paste data into it using the Edit
> Paste (Ctrl+V) command but you will receive an "Incompatible Paste
Area" message if the number of rows and columns you are copying is different
from what you selected. This is not the same as the Paste Special method
for setting up and entire grid which must have a selected area of exactly
the (rows+3) * (columns +3).
To dynamically add or delete rows and columns,
first click into the row or column where you want to insert or delete and
then click the desired command. You can only add or delete in the area
that contains the numerical data and not in the headers.
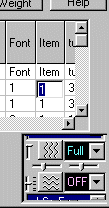
If "Weight" is checked then you can apply weights
against each construct (ROW). Weighting would seem to have little value
when used in combination with normalization because it is applied first.
When weighting is turned on, an extra column of data at the end of the
grid is used to enter a number for each row. This number is then multiplied
by all the elements in that row prior to analyzing the grid.
If you are considering adding weights to data which is outside the scope
of the rest of the grid it is worth processing section one again and again.
Each time you will modify the weights until this variation for this data
comes within an acceptable boundary as determined by the rest of the grid
data. Then you can continue with the analysis. The
cells at the top and bottom of the Weight column are reserved for future
use and will probably specify default formulae to be used.
You can become quite imaginative with the descriptions of grids that
contain inordinate data as in the following example from the crimetspc.txt
grid that was used to explain the  control. i.e.,
This is an analyzed weighted "View" Grid
named "CRIME RATES at 1000 people per square mile" Completed by "SAS Institute
& T.S.P .& j.Legg" on "06-27-1987". The grid was formed by evaluating
"48 STATES" in terms of "10 VARIABLES" using a "-100%" significance factor.
Note: - If you Transpose the grid you will loose the weight column.
In the Dos program, there was only room for the
name of the top score of the bi-polar construct. However during elicitation,
which was best done using pencil and paper, it was important that the opposite
end of the grading scale be firmly fixed in mind as the scoring was done
so as not to get a wandering of meaning. This opposite name was usually
written down as a guide and the opposite of it is again checked to see
that it was in fact an opposite. At least that's what I did.
Bear in mind that, when inspecting the plot,
the interpretation of the meaning of the components is made by inspecting
the distance of the construct points away from the center and their proximity
to the component line.
In the DOS program, because these construct points are within the same
space as the elements denoted by the "*" place holding character there
was only logically room for one name. It didn't matter if the emergent
construct was favorable or unfavorable it always lay toward the top score.
However if there is a mixture of favorable and unfavorable construct names,
then the only table that would give an inconclusive interpretation is the
'Section
2: Strength of Feeling' table where the sign of the 'totals' doesn't
indicate what it does if the construct names were all favorable. i.e. if
the total is -ve the feeling is negative and +ve means the feeling is positive.
Anyway, these early analysis
results are mainly used for logical checking of meanings as it is the plot
that's important.
What you should now do in order to extract the meanings underlying any
general grid (say for hobbies) is to find factors (or constructs) that
discriminate between the hobbies (or elements). When you are trying to
come up with initial terms avoid the temptation of thinking too widely.
Do this by :-
Take a pair of hobbies at random and asking what is it that makes one different
from the other, or
Take three random hobbies at a time and ask what is it that makes one different
from the other two.
After doing the above for a few rows start looking at pairs of hobbies
that seem to be scoring the same and force construct names to pop up in
your mind that will pull the hobbies apart and use those.
When the repertory technique starts to fail in coming up with new constructs,
start asking yourself about other dimensions that are important to you
that you haven't yet thought of, such as 'lust' etc.
Ask others for constructs that they might use. But don't let anyone influence
your meaning of the terms.
When you find it hard to think of new constructs for normal grids you should
have been able to obtain at least as many constructs as there are elements.
Very small grids are useless and very large grids are too confusing.
The inGridX system does not employ factor analysis as
there are no preconceived factors that you are trying to fit the data to.
When you analyze a grid with both elements and constructs you will understand
the plot much better. Even though in some of my examples the elements and
the constructs are the same you should know the repertory technique before
trying a straight (or fuzzy) distance (or adjacency) grid.
Having said all that there is no reason why ranking
cannot be used instead of grading.
Experienced grid users may quickly become used to thinking in greater
dimensions and are aware of a greater convergence of signal lines that
impinge on the grading at hand. These impingement's could be considered
noise and the user compensates with a decreased differentiation. However,
the experienced user realizes that the introduction of cognitive noise
sharpens the focus.
A Special note about the "Mid Point".
If a question mark (?) is entered in any cell then the value that
it will receive is the average of the ROW it is in. This causes the element
with the question mark (?) to have no effect on the importance of the construct
in the final analysis. Use this where you don't know or where a question
is non applicable.
When you are gathering data for inGridX it is just as easy to continually
reposition the Grid Table to keep the current cell in focus. In this
way, by jumping around to add input here and there, you can sometimes end
up with lots of missing data. It therefore pays to have a strategy for
how to handle this missing data. For example, unless the missing data specifically
refers to an averaged mid-point, in which case you would leave a question
mark in those cells for inGridX to handle, you should use another word
or spreadsheet program to search and replace your data. Firstly, in order
to smooth it and then secondly to replace all the question marks to a low
point.
A "Cell Tracking" feature works in conjunction with a visible Grid Entry
Table over a visible plot. To activate this feature you need to check the
"Step control" to stop the
timer  .
Then clicking the "Next"
.
Then clicking the "Next" or "Back"
 commands will increment or decrement a scrolling list of element and construct
labels and expanded descriptions. For each pair of row and column labels,
that are displayed at the bottom of the plot, there is a signed cell value
and identification markers showing the exact position within the plot of
the pair of features. For large grids this makes for easy identification
of a feature's exact position within a plot. If "Back"
was used to pause the toggling labels then "Next"
can be used to increment just the selected (left or right) list.
Alternatively, selecting a cell from within the Grid Entry Table has the
same effect and you can quickly scroll through all the cells this way.
In doing so, the background color of the cell in the Grid Entry Table is
highlighted when a suspected anomaly is found by comparing an 'off-signed'
cell value with the grid's range of values.
commands will increment or decrement a scrolling list of element and construct
labels and expanded descriptions. For each pair of row and column labels,
that are displayed at the bottom of the plot, there is a signed cell value
and identification markers showing the exact position within the plot of
the pair of features. For large grids this makes for easy identification
of a feature's exact position within a plot. If "Back"
was used to pause the toggling labels then "Next"
can be used to increment just the selected (left or right) list.
Alternatively, selecting a cell from within the Grid Entry Table has the
same effect and you can quickly scroll through all the cells this way.
In doing so, the background color of the cell in the Grid Entry Table is
highlighted when a suspected anomaly is found by comparing an 'off-signed'
cell value with the grid's range of values.